Better Coffee

fuelled by knowledge

We love good coffee, and believe making the best cup is all about knowledge.

OUR STORY

OUR COFFEE IN THE WILD

Find coffee from thirdeye coffee roasters in person.

Find the brew fit for you

Tell us how you like your coffee

We are here to learn how you like your brew.

Answer some questions about your coffee habits and we will work out the perfect beans for you.

Select your subscription

Based on your answers, we will show you what brew is right for you

plus a couple more options if you’re feeling adventurous!

Coffee delivered to your door

We will let you know what quantity you should get and how often.

All you have to do is hit the go button, sit back and wait for your beans to arrive at your door.

From bean to cup, we’re all about bringing you better coffee.

Find our coffee in the wild

Sparrows

1 Austin Street,
Onekawa
Open Hours:
Monday – Friday, 7:30am – 2pm
Saturday & Sunday, 8:30am – 2pm

Georgia on Tennyson

42 Tennyson Street,
Napier South
Open Hours:
Monday – Friday, 7:30am – 2pm
Saturday & Sunday, 8:30am – 2pm

Meet the coffee

Experience our curated selection of coffee, two vibrant single origins, our speciality house blend, and probably the best decaf you’ll ever try, all roasted here in New Zealand.

Home > Our Stockists

Sparrows

Our roasting HQ. A beautiful space, for a coffee and to see the roasting process.
We regularly host public cupping sessions where you can come and taste our fresh crop coffees and learn about the process from bean to cup. Pop in for a yarn with our Baristas, they make a mean cup and they’re pretty cute too.

1 Austin Street, Onekawa

Open Hours:

Monday – Friday, 7:30am – 2pm

Saturday & Sunday, 8:30am – 2pm

Georgia on Tennyson

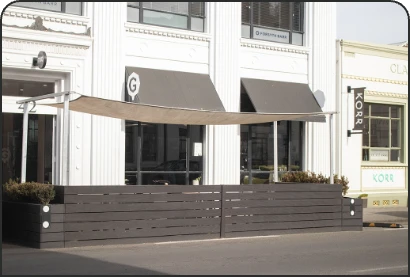
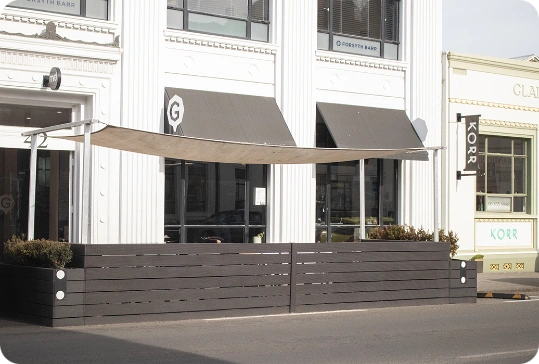
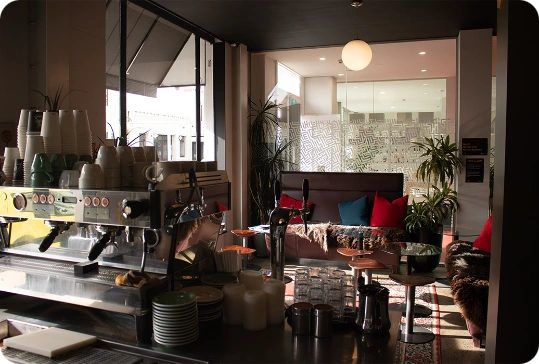
The flagship space, Napier’s OG espresso bar. Nestled in an iconic Art Deco listed building that catches the morning sun, the perfect place to stop for a coffee, or get one to go if you’re on the run.

Banter is always 10/10 and on Fridays the beer is cold and the chat is bottomless.

42 Tennyson Street, Napier South

Open Hours:

Monday – Friday, 7:30am – 2pm

Saturday & Sunday, 8:30am – 2pm

Other places to buy:

  • Bellatinos – Havelock North
  • Bellatinos – Bay View
  • Bellatinos – Hawke’s Bay Airport
  • Bellatinos – Napier South
  • Chantals – Napier

Find the brew fit for you

We have created this tool to help you find the perfect brew for you. Follow through the steps to determine your coffee needs.

Home > Contact

We’d love to hear from you!

Have a coffee related question? Fill out the form below and someone will be in touch.

How we got here

Our journey to thirdeye coffee roasters began in 2016, when we opened our flagship espresso bar, Georgia on Tennyson, in the quaint little town of Napier, New Zealand.

The concept of an “espresso bar”; where our focus is entirely on the quality of our coffees, and we serve only minimal cabinet food, and no brekkie at all(!?) was a foreign one to the Napierite locals. Slowly but surely, after many bemused morning conversations about Eggs Bene, we began to win over the hearts and minds of some of the locals who appreciated the opportunity to drink better coffee without the distraction of a meal.

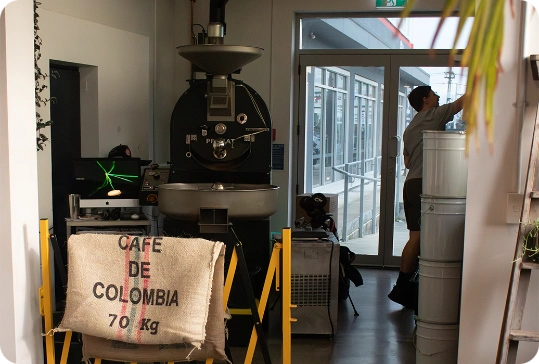
After three years of trading, and serving great coffee made from someone else’s beans, we decided we wanted to move up the supply chain; we would roast better coffee.

We bought our own coffee roaster from Chicago in the United States, and brought it into New Zealand, we searched local spaces available to install our new roasting equipment, and found our Austin Street location, we forged relationships with international coffee bean growers and suppliers in Brazil, Columbia, Honduras, and many other countries, so that we could have touchpoints across the entire process from bean to brew.

With that first 10kg of beans roasted in our new coffee roaster, in our new roastery location, thirdeye coffee roasters was truly born. We knew we could absolutely create coffee without compromise.

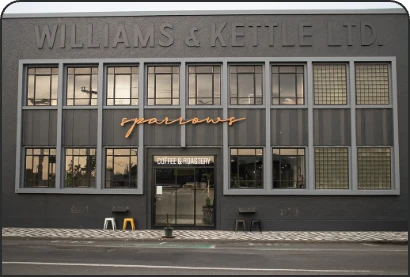
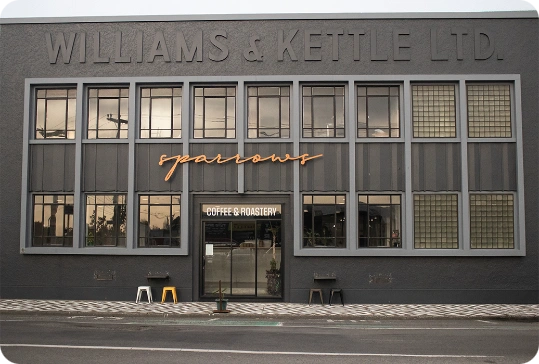
Where to, from there? We opened a second espresso bar, Sparrows, attached to the thirdeye coffee roastery – which has given us a whole new cohort of locals to meet and win over. We supply our beans to a number of local coffee houses across Hawke’s Bay. And now, we’re making our foray into direct to consumer bean supply. You, too, can now drink better coffee at home.

About the brand

Better coffee fuelled by knowledge.

Coffee is the only thing we take seriously. We enjoy sourcing rare and interesting coffees. Each new shipment of beans is its own vintage; and each batch is roasted very specifically to get the absolute best, most nuanced result from those beans.

No two batches of thirdeye coffee roasters coffee will ever be exactly the same, and that’s the way we want it. From the seeds of the coffee bush, to the coffee cherries and their beans, to the first and second cracks of the roasting process, to the brewing process that delivers you that final cup of thirdeye coffee roasters coffee; you know that you are consuming better coffee, coffee that has been made without compromise.

Meet the team

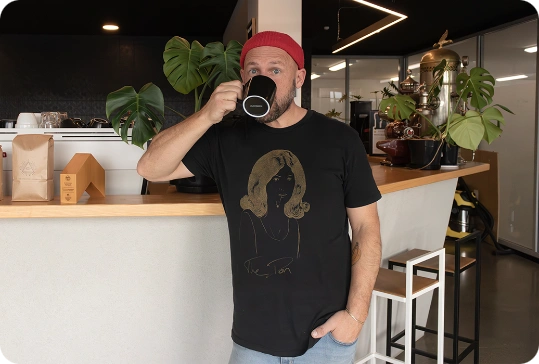
We’re much better looking in person. Come and meet us over a cup of thirdeye coffee roasters at either Georgia on Tennyson or Sparrows.

When it comes to making that perfect cup of coffee, there’re a whole bunch of ways to do it; from using different brewing apparatus, to how you grind your beans, to how you mix water with your precious coffee grounds.

These factors each play a big role in how your coffee tastes once you finally get to drink it. Here are our instructions to ensure you can always brew the perfect cup at home:

Espresso

Strength-ometer:

10/10

Coffee to Water Ratio – 1:2

Why we rate it

Espresso is the Caffeine Daddy; with a bean to water ratio of 1:2 a well pulled espresso shot is what’s going to give you the mightiest boost morning, noon or night.

The strength behind an espresso shot lends itself to being taken straight or mixed with milk, however you like it best.

We love espresso coffee for its super high intensity flavour, and because it showcases the skills of our baristas; there’s nowhere to hide in a long black.

What you need:

To pull a New Zealand double (~60ml espresso at the end):

  • Scale
  • 30g coffee beans (not sure which ones; check out our brew finder to find out)
  • Grinder (we recommend this one)
  • Tamp
  • Espresso machine
  • Drinking vessel (could be a demitasse, could be a mug – we’ll only judge a little)

FYI:

You need to clean and dry your portafilter in between shots to maintain consistency if you’re serving more than one espresso at a time.

A Flat White is the pavlova of the coffee world. The iconic antipodean drink gained popularity among both Kiwi and Aussie caffeine connoisseurs in the 1980’s. Officially, whether it was Wellington, Sydney or Melbourne that the Flat White was first created has been lost to the annals of history. Unofficially, we all know who really came up with it first.

How to brew your coffee:

  1. Turn your machine on, and allow it to come up to temperature and pressure. You should get your portafilter and drinking vessel warming up now too.
  2. Grind your beans to a fine grit, think table salt size.
  3. Pour the coffee grounds into the (warmed) portafilter’s basket, and spread them out to create a fairly level surface.
  4. Tamp the coffee – Here you’re compressing the coffee grounds, removing any air pockets and totally levelling the surface. Water will always take the path of least resistance; any inconsistencies with the tamp will result in some parts of the puck getting over extracted, and some parts getting under extracted. Lean the portafilter against a stable surface and press down evenly with the tamp. Standard recommendation is to keep your elbow at a right angle and apply 30 pounds of force.
  5. Securely attached the portafilter to the group head of your machine – Make sure that thing’s locked in tight. No one likes an espresso explosion when the portafilter falls out and sends hot water and wet coffee grounds everywhere.
  6. Go! Start the extraction – if you’re timing it manually; you’re aiming for ~60ml in ~30 seconds. If your machine comes with pre-sets – Press the “Double Shot” button.
    You’re looking for a golden syrup like pour that start our caramel blond before darkening to brunette. The finished shot should separate into a creamy crema on top of the dark chocolate coffee underneath.
  7. Doll it up – Top your espresso shot off with hot water, steamed milk, pouring cream, or knock it back straight. Enjoy!

Stove Top

Strength-ometer:

8/10

Coffee to Water Ratio – 1:12

Why we rate it

A brewing method of many names; caffettiera, moka pot, or stovetop espresso. Whatever you call it, they’ll all make your coffee the same way; by using steam to pressurise water and forcing it up, through your coffee grounds and into the repository on top.

We love a stovetop espresso for their ease of use, affordability, and production of a final brew that sits perfectly between an espresso shot and a mug of plunger coffee.

What you need:

For ~180ml of brewed coffee:

  • Scale
  • 30g coffee beans (not sure which ones; check out our brew finder to find out)
  • Grinder (we recommend this one)
  • Stovetop espresso (caffettiera or moka pot)
  • 300ml water
  • Stovetop
  • Drinking vessel

FYI:

A stovetop espresso’s volume is measured by Italian demitasse (30ml) cups. If you’re someone who takes their hit out of a mug, you might find that you measure three (or more!) Italians.

Stovetop espresso makers first made it down-under with Italian migrants after WWII.

How to brew your coffee:

  1. Grind your beans to a medium-fine size; not as fine as for an espresso machine, but finer than you’d use for a pour-over coffee.
  2. Fill the base of the stovetop espresso with 300ml of water, or to just below the pressure valve.
  3. Place the filter funnel (the middle bit) of the stovetop espresso on top of the base and pour the coffee beans in. Level them out, but don’t tamp.
  4. Screw the top park of the stovetop espresso onto the bottom. Make sure the seal is tight!
  5. Put the stovetop espresso on the stovetop (surprising, we know) over a low heat setting.
  6. Wait patiently while the pressure builds in the base of the stovetop espresso; forcing the hot water up to percolate through the coffee grounds and out into the top chamber. Don’t be tempted to turn up the heat here – that’ll give you unpleasantly bitter coffee.
  7. As soon as the stovetop espresso sounds like it’s drowning (or starts to sputter) whip it off the stovetop and you’re ready to serve, with or without milk!

Plunger

Strength-ometer:

7/10

Coffee to Water Ratio – 1:17

Why we rate it

You know you have one of these lying around. We all do! Like the stovetop espresso the plunger is an apparatus of many names; cafetière (like the stovetop espresso’s caffettiera, but French), French press, or plunger.

We love a plunger coffee…

What you need:

For ~1L of brewed coffee:

  • Scale
  • 60g coffee beans (not sure which ones; check out our brew finder to find out)
  • Grinder (we recommend this one)
  • Plunger
  • Kettle
  • 1L water
  • Stirring implement
  • Drinking vessel

FYI:

A plunger is probably the most common brewing method in New Zealand homes.

You can also use a plunger to brew tea, or strain (particularly shellfish) stock… Just don’t come crying to us if your next coffee tastes like fish.

How to brew your coffee:

  1. Grind your beans to a coarse size; you don’t want any grounds escaping through the plunger’s mesh filter and ending up in your cup, or your teeth!
  2. Preheat your beaker with hot water (this is especially important if you have an insulated, stainless steel plunger), discard the water once the plunger is warm.
  3. Tip your ground coffee into your warm plunger and pour a little recently boiled water over the top…
  4. Once the beaker is ~half way full, give the beans and water a stir to disperse the grounds, making sure nothing’s stuck at the bottom.
  5. Fill the plunger the rest of the way, leaving ~2cm gap at the top of the beaker.
  6. Now we wait. Give the coffee 3-4 minutes to infuse.
  7. And then; we plunge! Place the mesh of the plunger gently over the top of the beaker and make sure the lid is sealed. SLOWLY press the plunger down to separate the coffee grounds from the coffee and prevent over extraction.
  8. Pour into your preferred drinking vessel, with or without milk, and you’re away.

Pour Over Chemex

Strength-ometer:

4/10

Coffee to Water Ratio – 1:16

Why we rate it

Proponents of the Chemex desire clarity of coffee without compromise. We respect that. Because of its unique filter paper; a Chemex produces a brew so clear, it’s almost like tea to look at.

What you need:

For ~500ml of brewed coffee:

  • Scale
  • 30g coffee beans (not sure which ones; check out our brew finder to find out)
  • Grinder (we recommend this one)
  • Chemex brewing jug
  • Chemex paper filters (bonded paper filters)
  • ~500ml water
  • (Ideally) Goose-neck kettle – or a standard kettle and steady hand
  • Stirring implement
  • Timer
  • Drinking vessel

FYI:

You need to use a coarser grind for a Chemex pour over than you would use for a Hario V60 pour over, even though the brew method is largely the same. Chemex filters are made using a bonded paper method, which slows down the extraction process, a coarser grind of coffee balances out the impact of the slower extraction by decreasing the available surface area of each coffee grind and preventing over extraction.

It is important to note that the tight weave of the Chemex filter also works to hold back some of the coffee beans’ natural oils; decreasing crema and sacrificing mouth feel. The clarity of that final brew, though, is unsurpassable.

How to brew your coffee:

  1. Boil your kettle and allow the water to come down in temperature while you;
  2. Grind your beans to a medium-coarse size; not as coarse as you’d use for a plunger coffee but not as fine as a stovetop espresso needs either.
  3. Place your filter in the top of the Chemex so that the side with three folds is against the spout.
  4. Get the filter thoroughly soaked with hot water, and tip the water out once it filters through to the base of the Chemex.
  5. Put your ground coffee into the wet filter and pour ~100ml of your recently boiled water over the coffee and give them a gentle stir to make sure all the grounds are evenly wet.
  6. Leave the coffee to “bloom” for ~30 seconds. This allows the coffee grounds to de-gas and provides a more profound brew.
  7. This is where the Gooseneck Kettle really comes into its own; Slowly, carefully pour the remaining water over the coffee grounds using a circular motion. You don’t want the water to hit the sides of the Chemex or you’ll stuff up the extraction and ruin all the effort made to bloom the grounds in the first place.
  8. Give the grounds and water in the filter a quick stir, and leave for ~3½ to 5 minutes. Until all the water has gone from the top, and has stopped dripping into the bottom.
  9. Remove the filter (and its used grounds) from the top of the Chemex, give the brewed coffee a delicate swirl and serve in your preferred drinking vessel with or without milk.

Pour Over Hario V60

Strength-ometer:

4/10

Coffee to Water Ratio – 1:17

Why we rate it

The Hario V60 is your gateway into special coffee brewing. We love inspiring new caffeine aficionados, and the Hario V60 is a great place to start.

What you need:

For ~230ml of brewed coffee with a Hario V60 “01”:

  • Scale
  • 15g coffee beans (not sure which ones; check out our brew finder to find out)
  • Grinder (we recommend this one)
  • Hario V60 Dripper
  • Paper filters
  • ~260ml water
  • (Ideally) Goose-neck kettle – or a standard kettle and steady hand
  • Stirring implement
  • Timer
  • Drinking vessel (typically a mug, you’ll need something sturdy for this one)
  • (Optional) Hario V60 Server Jug

FYI:

Japanese company; Hario has been developing coffee brewing apparatus since 1980, the Hario V60 has been available since 2004. The “V 60” refers to the 60 degree angle of the ‘V’ shaped sides of the dripper.

The Hario V60 is available in three different sizes; “01” (for 1 cup) “02” (for 1–4 cups) “03” (for 1–6 cups)

How to brew your coffee:

  1. Boil your kettle and allow the water to come down in temperature while you;
  2. Grind your beans to a medium size; slightly finer than you’d use for the bonded paper filters of a Chemex.
  3. Balance your Hario V60 Dripper over the mouth of your mug (or Hario V60 Server), and place your filter inside the dripper.
  4. Thoroughly soak the filter with hot water, and tip the water out once it filters through to your mug. Bonus – your mug is now pre-warmed!
  5. Put your ground coffee into the wet filter and pour ~100ml of your recently boiled water over the coffee and give them a gentle stir to make sure all the grounds are evenly wet.
  6. Leave the coffee to “bloom” for ~30 seconds.
  7. Slowly, carefully pour the remaining water over the coffee grounds using a circular motion. As much as possible, you don’t want the water to hit the sides of the dripper.
  8. Give the grounds and water in the filter a quick stir, and leave for ~3½ to 5 minutes. Until all the water has gone from the top, and has stopped dripping into the bottom.
  9. Remove the Hario V60 Dripper from over your mug, chuck (responsibly) the spent filter and coffee grounds – and you’re good to go, with or without milk!

Aero Press

Strength-ometer:

5/10

Coffee to Water Ratio – 1:16

Why we rate it

An AeroPress is great for the caffeinated mad scientist.

With an AeroPress, you can experiment with almost every recommended coffee making parameter. You can; change the size of the grind, throw the recommended coffee:water ratio out the window (if you must), lengthen or shorten the steep time… the forgiving nature of the AeroPress as a brew method will (almost always) let you get away with it.

What you need:

For ~200ml of brewed coffee:

  • Scale
  • 15g coffee beans (not sure which ones; check out our brew finder to find out)
  • Grinder (we recommend this one)
  • AeroPress
  • AeroPress filter papers
  • ~230ml water
  • Stirring implement
  • Timer
  • Drinking vessel

FYI:

The AeroPress was first developed in 2004 by Alan Adler because he wanted to enjoy a less acidic, less bitter-tasting brew. Adler released the first iteration of the AeroPress into the wild in 2005 and the rest, as they say, is history.

These days, you can even compete to be the AeroPress World Champion – if you think you’ve got what it takes

How to brew your coffee:

(Note: There are many ways to brew and AeroPress coffee, this is the industry standard.)

  1. Grind your beans to a medium coarseness; Coarser than for a stovetop espresso, but finer than for a Chemex
  2. Take the filter cap from the base of the cylindrical AeroPress chamber, place the filter in the filter cap and thoroughly soak the whole thing in hot water.
  3. Screw the filter cap onto the chamber and balance, filter down, over your chosen coffee receptacle.
  4. Pour your coffee grounds into the chamber and follow those with ~230ml of recently boiled water. Give it a stir.
  5. Leave the water to extract the coffee goodness from the beans for ~2 minutes.
  6. Give the mix one final stir, and place the plunger at the top of the chamber.
  7. Holding everything secure, gently depress the plunger all the way down.
  8. Remove the AeroPress from over your mug, chuck the spent filter and coffee grinds, and your fresh brew is ready for consumption.

How we got here

Lorem ipsum dolor sit amet, consectetur adipiscing elit, sed do eiusmod tempor incididunt ut labore et dolore magna aliqua. Ut enim ad minim veniam, quis nostrud exercitation ullamco laboris nisi ut aliquip ex ea commodo consequat. Duis aute irure dolor in reprehenderit in voluptate velit esse cillum dolore eu fugiat nulla pariatur. Excepteur sint occaecat cupidatat non proident, sunt in culpa qui officia deserunt mollit anim id est laborum.